第七章:多智能体协作
Posted by Youkale on 2025-10-11
← 上一章:规划 | 返回目录 | 下一章:记忆管理 →
第七章:多智能体协作
尽管单体智能体架构对于定义明确的问题可能有效,但当面临复杂的、跨多个领域的任务时,其能力往往受到限制。多智能体协作模式通过将系统构建为一个由不同且专业化的智能体组成的协作整体来解决这些限制。这种方法基于任务分解的原则,即将一个高层目标分解成离散的子问题。然后,每个子问题被分配给一个拥有最适合该任务的特定工具、数据访问或推理能力的智能体。
例如,一个复杂的调研查询可能会被分解并分配给一个研究智能体进行信息检索,一个数据分析智能体进行统计处理,以及一个综合智能体来生成最终报告。这种系统的有效性不仅仅在于分工,更关键地取决于智能体之间的通信机制。这需要一个标准化的通信协议和共享的本体(Ontology),允许智能体交换数据、委派子任务并协调其行动,以确保最终输出的一致性。
这种分布式架构提供了多项优势,包括增强的模块化、可扩展性和鲁棒性,因为单个智能体的故障不一定会导致整个系统的彻底崩溃。这种协作允许产生一种协同效应,使得多智能体系统的整体性能超越集合中任何单个智能体的潜在能力。
多智能体协作模式概述
多智能体协作模式涉及设计多个独立或半独立的智能体共同努力以实现一个共同目标的系统。每个智能体通常具有明确定义的角色、与总体目标一致的特定目标,并可能拥有访问不同工具或知识库的权限。这种模式的力量在于这些智能体之间的互动和协同作用。
协作可以采取多种形式:
- 顺序交接(Sequential Handoffs):一个智能体完成一项任务并将其输出传递给另一个智能体,作为流水线中的下一步(类似于规划模式,但明确涉及不同的智能体)。
- 并行处理(Parallel Processing):多个智能体同时处理问题的不同部分,它们的结果随后会被合并。
- 辩论与共识(Debate and Consensus):多智能体协作中,具有不同视角和信息来源的智能体参与讨论以评估选项,最终达成共识或做出更明智的决策。
- 分层结构(Hierarchical Structures):一个管理者智能体可以根据工作者智能体的工具访问或插件能力动态地委派任务,并综合他们的结果。每个智能体也可以处理相关的工具组,而不是由一个单一智能体处理所有工具。
- 专家团队(Expert Teams):在不同领域具有专业知识的智能体(例如,研究员、撰稿人、编辑)协作以产生一个复杂的输出。
- 批评-评审(Critic-Reviewer):智能体创建初始输出,如计划、草稿或答案。第二组智能体随后批判性地评估此输出,以确保其遵守政策、安全性、合规性、正确性、质量以及与组织目标的一致性。原始创建者或最终智能体根据此反馈修订输出。这种模式对于代码生成、研究写作、逻辑检查和确保伦理一致性尤其有效。这种方法的优势包括提高鲁棒性、改进质量以及减少幻觉或错误的可能性。
一个多智能体系统(见图 1)从根本上包括智能体角色和职责的界定、建立智能体交换信息的通信渠道,以及制定指导其协作努力的任务流或交互协议。
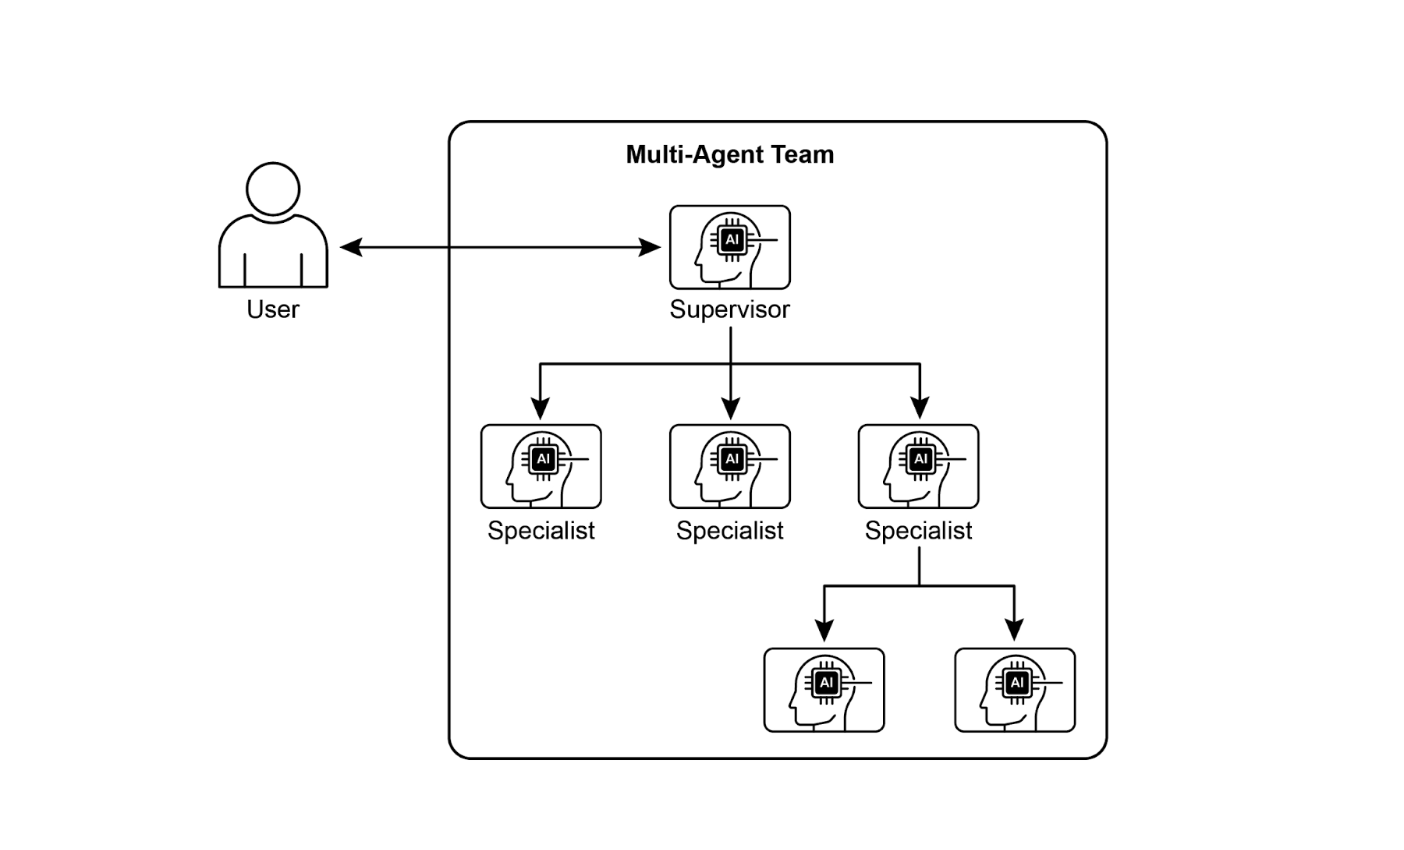
图 1:多智能体系统示例
诸如 Crew AI 和 Google ADK 之类的框架旨在通过提供用于规范智能体、任务及其交互过程的结构来促进这种范式。这种方法对于需要各种专业知识、包含多个离散阶段,或利用并发处理和跨智能体信息佐证的优势的挑战尤其有效。
实际应用与用例
多智能体协作是一种强大的模式,适用于众多领域:
- 复杂研究与分析:一个智能体团队可以协作进行一个研究项目。一个智能体可能专门搜索学术数据库,另一个总结研究结果,第三个识别趋势,第四个将信息综合成报告。这模仿了人类研究团队的操作方式。
- 软件开发:设想智能体协作构建软件。一个智能体可以是需求分析师,另一个是代码生成器,第三个是测试员,第四个是文档撰写者。它们可以在彼此之间传递输出以构建和验证组件。
- 创意内容生成:创建一个营销活动可能涉及一个市场研究智能体、一个文案撰写智能体、一个平面设计智能体(使用图像生成工具)和一个社交媒体排程智能体,它们都在一起工作。
- 金融分析:一个多智能体系统可以分析金融市场。智能体可能专门从事获取股票数据、分析新闻情感、执行技术分析和生成投资建议。
- 客户支持升级:一线支持智能体可以处理初始查询,并在需要时将复杂问题升级给专业智能体(例如,技术专家或计费专家),这展示了基于问题复杂性的顺序交接。
- 供应链优化:智能体可以代表供应链中的不同节点(供应商、制造商、分销商),并协作优化库存水平、物流和排程,以应对需求变化或中断。
- 网络分析与修复:自主操作极大地受益于智能体架构,特别是在故障定位方面。多个智能体可以协作对问题进行分类和修复,提出最佳行动。这些智能体还可以与传统的机器学习模型和工具集成,利用现有系统的同时提供生成式人工智能的优势。
界定专业化智能体并精心协调它们之间相互关系的能力,使开发者能够构建出展现增强的模块化、可扩展性以及处理对于单一、集成智能体而言将难以克服的复杂性的系统。
多智能体协作:探索相互关系与通信结构
了解智能体互动和通信的复杂方式是设计有效多智能体系统的基础。如图 2 所示,存在一个相互关系和通信模型的谱系,从最简单的单智能体场景到复杂的、定制设计的协作框架。每种模型都呈现出独特的优势和挑战,影响多智能体系统的整体效率、鲁棒性和适应性。
- 单智能体(Single Agent):在最基本的层面,“单智能体”独立操作,不与其他实体直接互动或通信。虽然这种模型易于实施和管理,但其能力本质上受限于单个智能体的范围和资源。它适用于可分解为独立子问题、每个子问题可由单个自给自足的智能体解决的任务。
- 网络(Network):”网络”模型代表了迈向协作的重要一步,其中多个智能体以去中心化的方式直接相互互动。通信通常以点对点(peer-to-peer)的方式发生,允许共享信息、资源甚至任务。这种模型培养了弹性,因为一个智能体的故障不一定会使整个系统瘫痪。然而,在大型、非结构化的网络中管理通信开销和确保一致的决策可能具有挑战性。
- 主管(Supervisor):在“主管”模型中,一个专用的智能体——“主管”监督和协调一组下属智能体的活动。主管充当通信、任务分配和冲突解决的中心枢纽。这种分层结构提供了清晰的权限线,可以简化管理和控制。然而,它引入了单点故障(主管),并且如果主管被大量的下属或复杂的任务淹没,可能会成为瓶颈。
- 作为工具的主管(Supervisor as a Tool):这种模型是“主管”概念的一个细微延伸,其中主管的角色更多是提供资源、指导或分析支持给其他智能体,而不是直接指挥和控制。主管可能会提供工具、数据或计算服务,使其他智能体能够更有效地执行其任务,而不必规定它们的每一个行动。这种方法旨在利用主管的能力,同时避免施加僵硬的自上而下控制。
- 分层(Hierarchical):“分层”模型在主管概念的基础上扩展,以创建多层组织结构。这涉及多个层级的主管,其中更高级别的主管监督更低级别的主管,最终在最低层级是一组操作智能体。这种结构非常适合可分解为子问题、每个子问题由特定层级管理的复杂问题。它提供了一种结构化的方法来管理可扩展性和复杂性,允许在限定的边界内进行分布式决策。
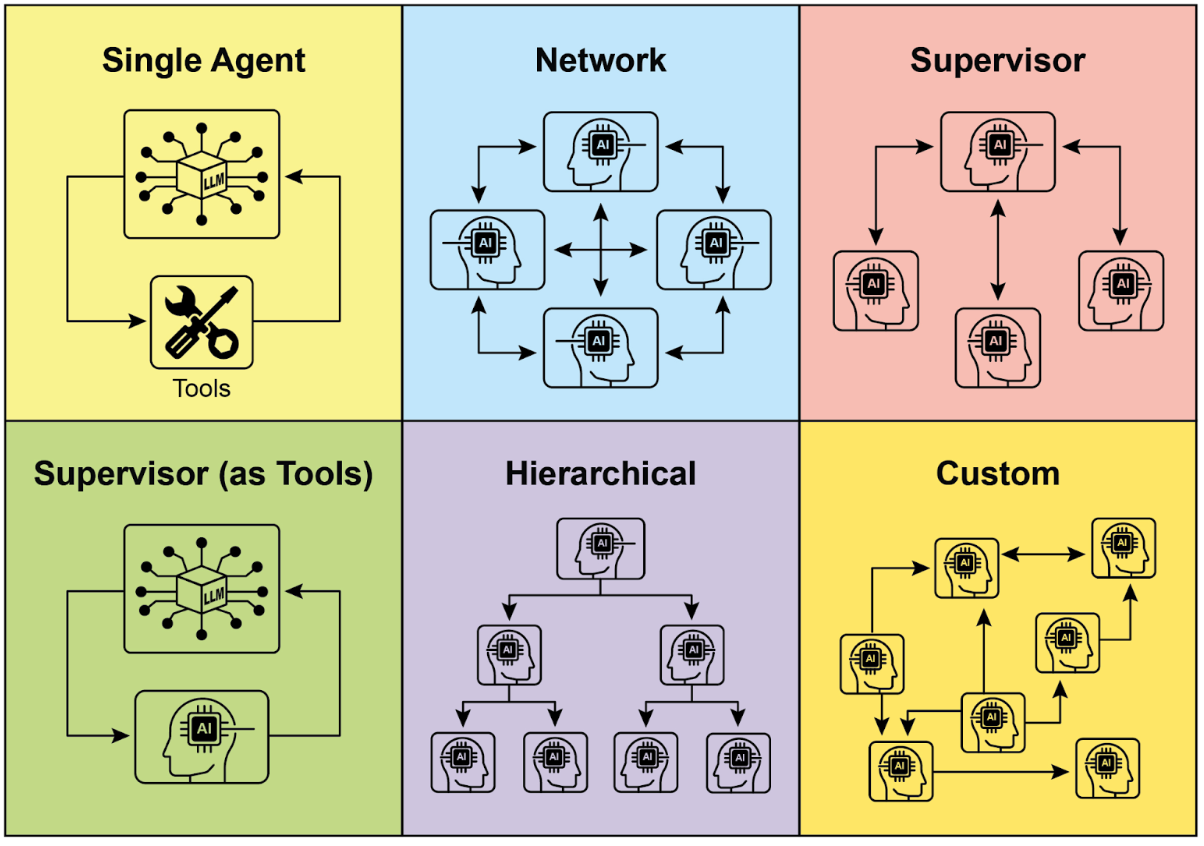
图 2:智能体以各种方式进行通信和互动。
- 定制(Custom):“定制”模型代表了多智能体系统设计中的终极灵活性。它允许创建独特的相互关系和通信结构,精确地根据给定问题或应用的特定要求进行定制。这可能涉及结合前述模型元素的混合方法,或从环境的独特约束和机遇中出现的全新设计。定制模型通常源于需要优化特定性能指标、处理高度动态的环境或将领域特定知识纳入系统架构的需求。设计和实施定制模型通常需要对多智能体系统原理有深入的理解,并仔细考虑通信协议、协调机制和涌现行为。
总之,多智能体系统的相互关系和通信模型的选择是一个关键的设计决策。每种模型都提供独特的优势和劣势,最佳选择取决于任务的复杂性、智能体的数量、所需的自主程度、对鲁棒性的需求以及可接受的通信开销等因素。多智能体系统未来的发展可能会继续探索和完善这些模型,并开发新的协作智能范式。
实践代码(Crew AI)
这段 Python 代码定义了一个使用 CrewAI 框架的 AI 驱动的“团队”(Crew),用于生成一篇关于 AI 趋势的博客文章。它首先设置环境,从 .env 文件加载 API 密钥。应用程序的核心包括定义两个智能体:一个研究员用于查找和总结 AI 趋势,以及一个撰稿人用于基于研究创建博客文章。
相应地定义了两个任务:一个用于研究趋势,另一个用于撰写博客文章,其中撰写任务依赖于研究任务的输出。然后,这些智能体和任务被组装成一个 Crew,指定了一个顺序执行任务的过程。Crew 使用智能体、任务和一个语言模型(具体为 “gemini-2.0-flash” 模型)进行初始化。主函数使用 kickoff() 方法执行此 Crew,协调智能体之间的协作以产生所需的输出。最后,代码打印出 Crew 执行的最终结果,即生成的博客文章。
 1
 2
 3
 4
 5
 6
 7
 8
 9
10
11
12
13
14
15
16
17
18
19
20
21
22
23
24
25
26
27
28
29
30
31
32
33
34
35
36
37
38
39
40
41
42
43
44
45
46
47
48
49
50
51
52
53
54
55
56
57
58
59
60
61
62
63
64
65
66
67
68
69
70
71
72
73
74
75
| import os
from dotenv import load_dotenv
from crewai import Agent, Task, Crew, Process
from langchain_google_genai import ChatGoogleGenerativeAI
def setup_environment():
"""Loads environment variables and checks for the required API key."""
load_dotenv()
if not os.getenv("GOOGLE_API_KEY"):
raise ValueError("GOOGLE_API_KEY not found. Please set it in your .env file.")
def main():
"""
Initializes and runs the AI crew for content creation using the latest Gemini model.
"""
setup_environment()
# Define the language model to use.
# Updated to a model from the Gemini 2.0 series for better performance and features.
# For cutting-edge (preview) capabilities, you could use "gemini-2.5-flash".
llm = ChatGoogleGenerativeAI(model="gemini-2.0-flash")
# Define Agents with specific roles and goals
researcher = Agent(
role='Senior Research Analyst',
goal='Find and summarize the latest trends in AI.',
backstory="You are an experienced research analyst with a knack for identifying key trends and synthesizing information.",
verbose=True,
allow_delegation=False,
)
writer = Agent(
role='Technical Content Writer',
goal='Write a clear and engaging blog post based on research findings.',
backstory="You are a skilled writer who can translate complex technical topics into accessible content.",
verbose=True,
allow_delegation=False,
)
# Define Tasks for the agents
research_task = Task(
description="Research the top 3 emerging trends in Artificial Intelligence in 2024-2025. Focus on practical applications and potential impact.",
expected_output="A detailed summary of the top 3 AI trends, including key points and sources.",
agent=researcher,
)
writing_task = Task(
description="Write a 500-word blog post based on the research findings. The post should be engaging and easy for a general audience to understand.",
expected_output="A complete 500-word blog post about the latest AI trends.",
agent=writer,
context=[research_task],
)
# Create the Crew
blog_creation_crew = Crew(
agents=[researcher, writer],
tasks=[research_task, writing_task],
process=Process.sequential,
llm=llm,
verbose=2 # Set verbosity for detailed crew execution logs
)
# Execute the Crew
print("## Running the blog creation crew with Gemini 2.0 Flash... ##")
try:
result = blog_creation_crew.kickoff()
print("\n------------------\n")
print("## Crew Final Output ##")
print(result)
except Exception as e:
print(f"\nAn unexpected error occurred: {e}")
if __name__ == "__main__":
main()
|
我们现在将深入探讨 Google ADK 框架内的更多示例,特别强调分层、并行和顺序协调范式,以及将智能体作为操作工具的实现。
实践代码(Google ADK)
以下代码示例展示了通过创建父子关系在 Google ADK 内建立分层智能体结构。代码定义了两种类型的智能体:LlmAgent 和一个源自 BaseAgent 的自定义 TaskExecutor 智能体。TaskExecutor 专为特定的非 LLM 任务而设计,在此示例中,它仅生成一个“任务成功完成”事件。一个名为 greeter 的 LlmAgent 使用指定的模型和指令被初始化为友好的问候者。自定义的 TaskExecutor 被实例化为 task_doer。一个名为 coordinator 的父 LlmAgent 被创建,也带有模型和指令。coordinator 的指令指导它将问候委派给 greeter,并将任务执行委派给 task_doer。greeter 和 task_doer 被添加为 coordinator 的子智能体,建立了父子关系。代码随后断言此关系已正确设置。最后,它打印一条消息,表明智能体层次结构已成功创建。
 1
 2
 3
 4
 5
 6
 7
 8
 9
10
11
12
13
14
15
16
17
18
19
20
21
22
23
24
25
26
27
28
29
30
31
32
33
34
35
36
37
38
39
40
41
42
43
44
45
| from google.adk.agents import LlmAgent, BaseAgent
from google.adk.agents.invocation_context import InvocationContext
from google.adk.events import Event
from typing import AsyncGenerator
# Correctly implement a custom agent by extending BaseAgent
class TaskExecutor(BaseAgent):
"""A specialized agent with custom, non-LLM behavior."""
name: str = "TaskExecutor"
description: str = "Executes a predefined task."
async def _run_async_impl(self, context: InvocationContext) -> AsyncGenerator[Event, None]:
"""Custom implementation logic for the task."""
# This is where your custom logic would go.
# For this example, we'll just yield a simple event.
yield Event(author=self.name, content="Task finished successfully.")
# Define individual agents with proper initialization
# LlmAgent requires a model to be specified.
greeter = LlmAgent(
name="Greeter",
model="gemini-2.0-flash-exp",
instruction="You are a friendly greeter."
)
task_doer = TaskExecutor() # Instantiate our concrete custom agent
# Create a parent agent and assign its sub-agents
# The parent agent's description and instructions should guide its delegation logic.
coordinator = LlmAgent(
name="Coordinator",
model="gemini-2.0-flash-exp",
description="A coordinator that can greet users and execute tasks.",
instruction="When asked to greet, delegate to the Greeter. When asked to perform a task, delegate to the TaskExecutor.",
sub_agents=[
greeter,
task_doer
]
)
# The ADK framework automatically establishes the parent-child relationships.
# These assertions will pass if checked after initialization.
assert greeter.parent_agent == coordinator
assert task_doer.parent_agent == coordinator
print("Agent hierarchy created successfully.")
|
这段代码摘录说明了在 Google ADK 框架内使用 LoopAgent 来建立迭代工作流。代码定义了两个智能体:ConditionChecker 和 ProcessingStep。ConditionChecker 是一个自定义智能体,它检查会话状态中的一个“status”值。如果“status”是“completed”,ConditionChecker 会升级一个事件以停止循环。否则,它会生成一个事件以继续循环。ProcessingStep 是一个使用 “gemini-2.0-flash-exp” 模型的 LlmAgent。它的指令是执行一个任务,如果它是最后一步,则将会话“status”设置为“completed”。创建了一个名为 StatusPoller 的 LoopAgent。StatusPoller 配置了 max_iterations=10。StatusPoller 将 ProcessingStep 和一个 ConditionChecker 实例都作为子智能体包含在内。LoopAgent 将顺序执行子智能体,最多执行 10 次迭代,如果 ConditionChecker 发现状态为“completed”,则停止。
 1
 2
 3
 4
 5
 6
 7
 8
 9
10
11
12
13
14
15
16
17
18
19
20
21
22
23
24
25
26
27
28
29
30
31
32
33
34
35
36
37
38
39
40
41
42
43
44
45
46
47
| import asyncio
from typing import AsyncGenerator
from google.adk.agents import LoopAgent, LlmAgent, BaseAgent
from google.adk.events import Event, EventActions
from google.adk.agents.invocation_context import InvocationContext
# Best Practice: Define custom agents as complete, self-describing classes.
class ConditionChecker(BaseAgent):
"""A custom agent that checks for a 'completed' status in the session state."""
name: str = "ConditionChecker"
description: str = "Checks if a process is complete and signals the loop to stop."
async def _run_async_impl(
self, context: InvocationContext
) -> AsyncGenerator[Event, None]:
"""Checks state and yields an event to either continue or stop the loop."""
status = context.session.state.get("status", "pending")
is_done = (status == "completed")
if is_done:
# Escalate to terminate the loop when the condition is met.
yield Event(author=self.name, actions=EventActions(escalate=True))
else:
# Yield a simple event to continue the loop.
yield Event(author=self.name, content="Condition not met, continuing loop.")
# Correction: The LlmAgent must have a model and clear instructions.
process_step = LlmAgent(
name="ProcessingStep",
model="gemini-2.0-flash-exp",
instruction="You are a step in a longer process. Perform your task. If you are the final step, update session state by setting 'status' to 'completed'."
)
# The LoopAgent orchestrates the workflow.
poller = LoopAgent(
name="StatusPoller",
max_iterations=10,
sub_agents=[
process_step,
ConditionChecker() # Instantiating the well-defined custom agent.
]
)
# This poller will now execute 'process_step'
# and then 'ConditionChecker'
# repeatedly until the status is 'completed' or 10 iterations
# have passed.
|
这段代码摘录阐释了 Google ADK 内的 SequentialAgent 模式,该模式专为构建线性工作流而设计。此代码使用 google.adk.agents 库定义了一个顺序智能体流水线。该流水线由两个智能体 step1 和 step2 组成。step1 被命名为 “Step1_Fetch”,其输出将存储在会话状态中的键 "data" 下。step2 被命名为 “Step2_Process”,并被指示分析存储在 session.state["data"] 中的信息并提供摘要。SequentialAgent 命名为 “MyPipeline”,协调这些子智能体的执行。当流水线以初始输入运行时,step1 将首先执行。来自 step1 的响应将保存到会话状态中的键 "data" 下。随后,step2 将执行,并根据其指令利用 step1 放入状态中的信息。这种结构允许构建工作流,其中一个智能体的输出成为下一个智能体的输入。这是创建多步骤 AI 或数据处理流水线中的常见模式。
 1
 2
 3
 4
 5
 6
 7
 8
 9
10
11
12
13
14
15
16
17
18
19
20
| from google.adk.agents import SequentialAgent, Agent
# This agent's output will be saved to session.state["data"]
step1 = Agent(name="Step1_Fetch", output_key="data")
# This agent will use the data from the previous step.
# We instruct it on how to find and use this data.
step2 = Agent(
name="Step2_Process",
instruction="Analyze the information found in state['data'] and provide a summary."
)
pipeline = SequentialAgent(
name="MyPipeline",
sub_agents=[step1, step2]
)
# When the pipeline is run with an initial input, Step1 will execute,
# its response will be stored in session.state["data"], and then
# Step2 will execute, using the information from the state as instructed.
|
以下代码示例说明了 Google ADK 内的 ParallelAgent 模式,该模式有助于并发执行多个智能体任务。data_gatherer 旨在同时运行两个子智能体:weather_fetcher 和 news_fetcher。weather_fetcher 智能体被指示获取给定位置的天气并将结果存储在 session.state["weather_data"] 中。类似地,news_fetcher 智能体被指示检索给定主题的头条新闻故事并将其存储在 session.state["news_data"] 中。每个子智能体都被配置为使用 “gemini-2.0-flash-exp” 模型。ParallelAgent 协调这些子智能体的执行,允许它们并行工作。来自 weather_fetcher 和 news_fetcher 的结果将被收集并存储在会话状态中。最后,该示例展示了在智能体执行完成后如何从 final_state 访问收集到的天气和新闻数据。
 1
 2
 3
 4
 5
 6
 7
 8
 9
10
11
12
13
14
15
16
17
18
19
20
21
22
23
24
25
26
27
28
29
| from google.adk.agents import Agent, ParallelAgent
# It's better to define the fetching logic as tools for the agents
# For simplicity in this example, we'll embed the logic in the agent's instruction.
# In a real-world scenario, you would use tools.
# Define the individual agents that will run in parallel
weather_fetcher = Agent(
name="weather_fetcher",
model="gemini-2.0-flash-exp",
instruction="Fetch the weather for the given location and return only the weather report.",
output_key="weather_data" # The result will be stored in session.state["weather_data"]
)
news_fetcher = Agent(
name="news_fetcher",
model="gemini-2.0-flash-exp",
instruction="Fetch the top news story for the given topic and return only that story.",
output_key="news_data" # The result will be stored in session.state["news_data"]
)
# Create the ParallelAgent to orchestrate the sub-agents
data_gatherer = ParallelAgent(
name="data_gatherer",
sub_agents=[
weather_fetcher,
news_fetcher
]
)
|
所提供的代码片段例证了 Google ADK 内的**“智能体作为工具”范式,使得一个智能体能够以类似于函数调用的方式利用另一个智能体的能力。具体来说,代码使用 Google 的 LlmAgent 和 AgentTool 类定义了一个图像生成系统。它由两个智能体组成:一个父 artist_agent 和一个子 image_generator_agent。generate_image 函数是一个简单的工具**,用于模拟图像创建,返回模拟图像数据。image_generator_agent 负责根据它收到的文本提示使用这个工具。artist_agent 的作用是首先构思一个富有创意的图像提示。然后,它通过 AgentTool 封装器调用 image_generator_agent。AgentTool 充当一座桥梁,允许一个智能体将另一个智能体用作工具。当 artist_agent 调用 image_tool 时,AgentTool 会用艺术家构思的提示调用 image_generator_agent。然后,image_generator_agent 使用该提示调用 generate_image 函数。最后,生成的图像(或模拟数据)返回给上层智能体。这种架构展示了一个分层智能体系统,其中一个更高级别的智能体协调一个更低级别的、专业化的智能体来执行任务。
 1
 2
 3
 4
 5
 6
 7
 8
 9
10
11
12
13
14
15
16
17
18
19
20
21
22
23
24
25
26
27
28
29
30
31
32
33
34
35
36
37
38
39
40
41
42
43
44
45
46
47
48
49
50
51
52
53
54
55
56
57
58
59
| from google.adk.agents import LlmAgent
from google.adk.tools import agent_tool
from google.genai import types
# 1. A simple function tool for the core capability.
# This follows the best practice of separating actions from reasoning.
def generate_image(prompt: str) -> dict:
"""
Generates an image based on a textual prompt.
Args:
prompt: A detailed description of the image to generate.
Returns:
A dictionary with the status and the generated image bytes.
"""
print(f"TOOL: Generating image for prompt: '{prompt}'")
# In a real implementation, this would call an image generation API.
# For this example, we return mock image data.
mock_image_bytes = b"mock_image_data_for_a_cat_wearing_a_hat"
return {
"status": "success",
# The tool returns the raw bytes, the agent will handle the Part creation.
"image_bytes": mock_image_bytes,
"mime_type": "image/png"
}
# 2. Refactor the ImageGeneratorAgent into an LlmAgent.
# It now correctly uses the input passed to it.
image_generator_agent = LlmAgent(
name="ImageGen",
model="gemini-2.0-flash",
description="Generates an image based on a detailed text prompt.",
instruction=(
"You are an image generation specialist. Your task is to take the user's request "
"and use the `generate_image` tool to create the image. "
"The user's entire request should be used as the 'prompt' argument for the tool. "
"After the tool returns the image bytes, you MUST output the image."
),
tools=[generate_image]
)
# 3. Wrap the corrected agent in an AgentTool.
# The description here is what the parent agent sees.
image_tool = agent_tool.AgentTool(
agent=image_generator_agent,
description="Use this tool to generate an image. The input should be a descriptive prompt of the desired image."
)
# 4. The parent agent remains unchanged. Its logic was correct.
artist_agent = LlmAgent(
name="Artist",
model="gemini-2.0-flash",
instruction=(
"You are a creative artist. First, invent a creative and descriptive prompt for an image. "
"Then, use the `ImageGen` tool to generate the image using your prompt."
),
tools=[image_tool]
)
|
概要速览(At a Glance)
是什么 (What)
复杂的难题通常会超出单一、整体的基于 LLM 的智能体的能力。一个孤立的智能体可能缺乏处理多方面任务所有部分所需的多样化、专业化技能或特定工具。这种限制造成了瓶颈,降低了系统的整体有效性和可扩展性。结果是,解决复杂的、跨领域的目标变得效率低下,并可能导致不完整或次优的结果。
为什么 (Why)
多智能体协作模式通过创建多个协作智能体的系统来提供一个标准化的解决方案。一个复杂的问题被分解成更小、更易于管理的子问题。然后,每个子问题被分配给一个专业化智能体,该智能体拥有解决它所需的精确工具和能力。这些智能体通过定义的通信协议和互动模型(如顺序交接、并行工作流或分层委派)协同工作。这种基于智能体的分布式方法创造了一种协同效应,使得团队能够实现任何单一智能体无法达到的成果。
经验法则 (Rule of thumb)
当一个任务对于单个智能体来说过于复杂,并且可以分解为需要专业技能或工具的不同子任务时,请使用此模式。它非常适用于那些受益于多样化专业知识、并行处理或具有多个阶段的结构化工作流的问题,例如复杂的研究和分析、软件开发或创意内容生成。
视觉摘要
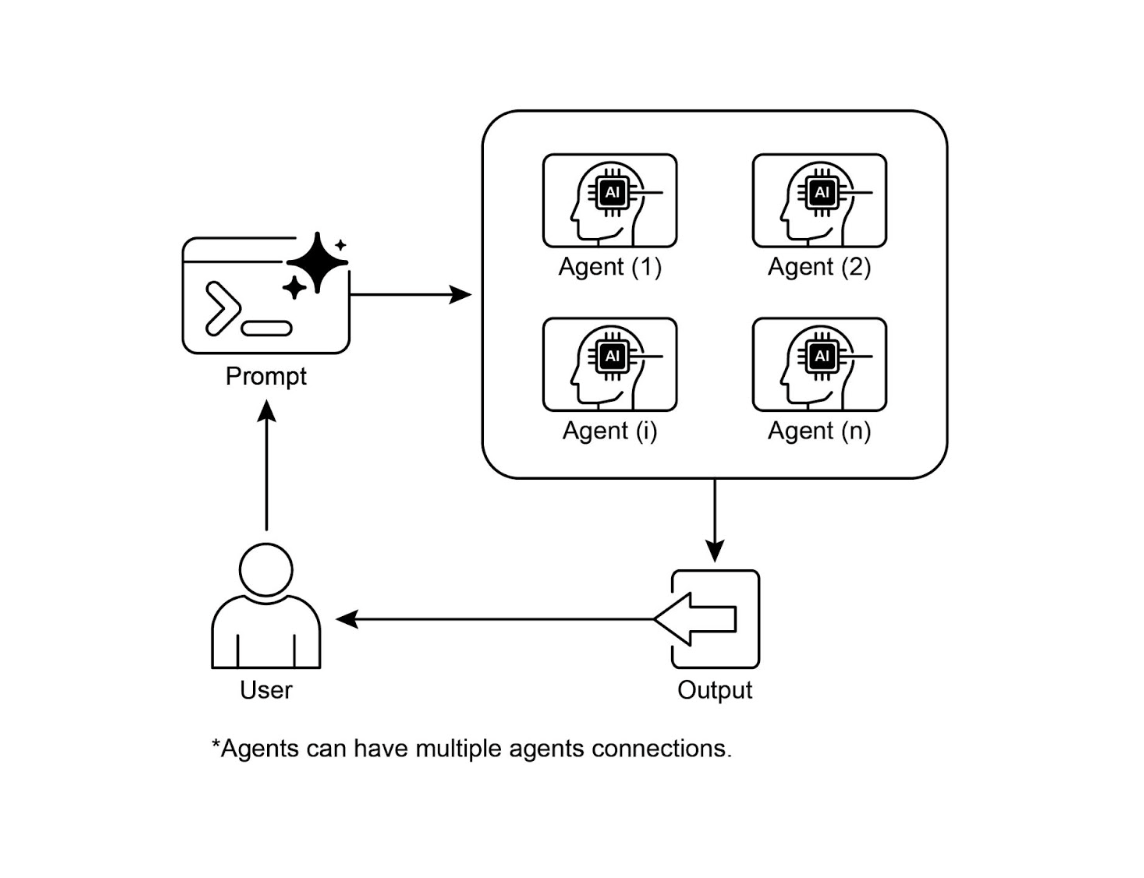
图 3:多智能体设计模式
关键要点
- 多智能体协作涉及多个智能体共同努力以实现一个共同目标。
- 这种模式利用专业化的角色、分布式任务和智能体间通信。
- 协作可以采取顺序交接、并行处理、辩论或分层结构等形式。
- 这种模式是处理需要多样化专业知识或多个不同阶段的复杂问题的理想选择。
结论
本章探讨了多智能体协作模式,展示了在系统中协调多个专业化智能体的好处。我们研究了各种协作模型,强调了该模式在解决跨越不同领域的复杂、多方面问题中的重要作用。对智能体协作的理解自然引出了对其与外部环境互动的探究。
参考文献